The popularity of Microsoft Teams has changed the way many people work. Workers aren’t attending events in person, they’re doing so virtually. If you’re organising a live event, one of the easiest ways you can do it is through Teams.
Setting up a Teams live event is easy – we talked about it in a previous blog. But if you’re a producer or presenter, there are a few things you need to be aware of prior to your event starting, to make sure everything runs smoothly, and your audience has a great experience!
Starting a Teams live event
On the day of your event, presenters and producers should join a few minutes early to make sure sound is working as it should be. The producer will need to make sure that their PowerPoint slides are ready to go as well.
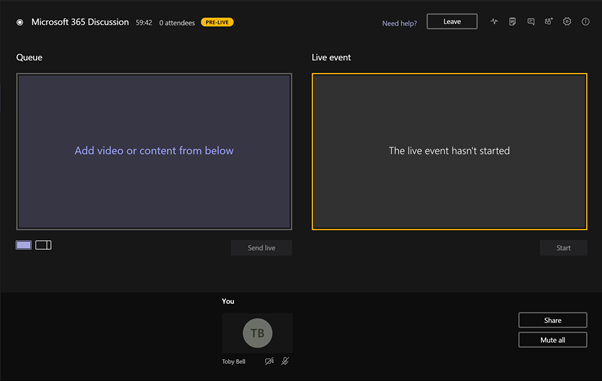
As a producer, once you join the event you will get a screen that looks like this:

You will notice the yellow button that says “pre-live”. This means that the event isn’t live yet, and the audience will not be able to see any of your preparations.
In order to share content from your computer, click the Share button in the bottom right. You can choose to share your full desktop, so the audience will see whatever is on your screen at the time, or share individual windows. If you’re sticking to a single slide deck, we’d recommend just sharing that window.
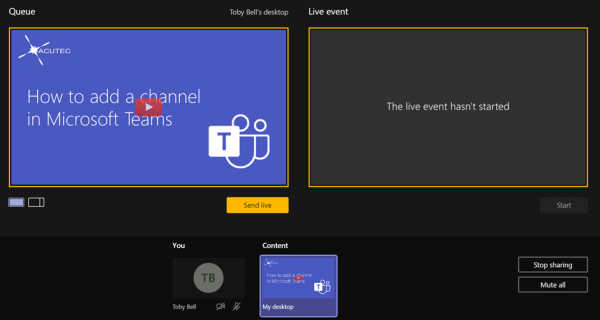
Once you’ve chosen the content to share, it will appear next to your webcam feed at the bottom. Click on the content, and it will appear in your queue:

If you’d like to present with your webcam and slides, click the button on the bottom left of the queue. This will display the producer/presenter as well as the slides.
When you’re happy, click Send live. This will display show whatever is in the queue in the live event section. If you want to update what you’re presenting, select a new window and click send live.
At this point, the event isn’t live for the audience to see. To go live, click Start. The following will appear:

The yellow “pre-live” will change to be a red “live”. Next to this, you can see the number of attendees, the amount of time it has been live, the name of the event and the red circle showing it’s recording.
At the end of the event, click the red End button to stop the recording.
Microsoft Teams Q&A
If you’ve enabled a Q&A, attendees have the option of asking questions during the event. This is separate to the event chat, which is generally used for sharing useful information, or can be used by the audience if the sound has stopped working!
The producer can choose to publish the questions for other audience members to see, and respond via text, or they can read them out and answer on the call.
Holding webinars and other live events in Teams is a great way to engage with your audience, and if you already have Microsoft 365 licenses, you don’t need to buy a separate webinar tool!
If you’d like to learn more about hosting your own live events, get in touch with ACUTEC today.

The Rise of Microsoft Purview – An ACUTEC Perspective
As data governance becomes a top priority for UK SMBs, the spotlight is turning to Microsoft Purview a platform that’s rapidly gaining traction across industries. At ACUTEC,

Building the Future of Tech Talent in Warwickshire
At ACUTEC, we believe the future of technology starts with investing in people. That’s why we’re proud to support apprenticeship pathways into tech, helping to

Cheap IT Services, Why Cutting Corners Could Cost You More
It’s July already, past the halfway point of the year! Whether you’re revisiting your 2025 IT strategy or simply trying to stay ahead of the

How to prepare for Windows 10 end of support by moving to Windows 11 today
As we approach the end of support for Windows 10 on Oct. 14, 20251, we want to ensure you are well-prepared for the transition to Windows

ACUTEC adopts the leading PSA software HALO for enhanced holistic IT services management.
ACUTEC, a leading UK-based IT managed services provider, is proud to announce its adoption of Halo Professional Services Automation as its new platform for service

This is not just a Cyber Attack, This a SIM swap Cyber Attack
M&S cyberattack used a lesser-known but dangerous technique, here’s what your business needs to know Marks & Spencer has been hit by a cyberattack exploiting

